🔍 Đọc thông tin pin🔍 Battery diagnostics
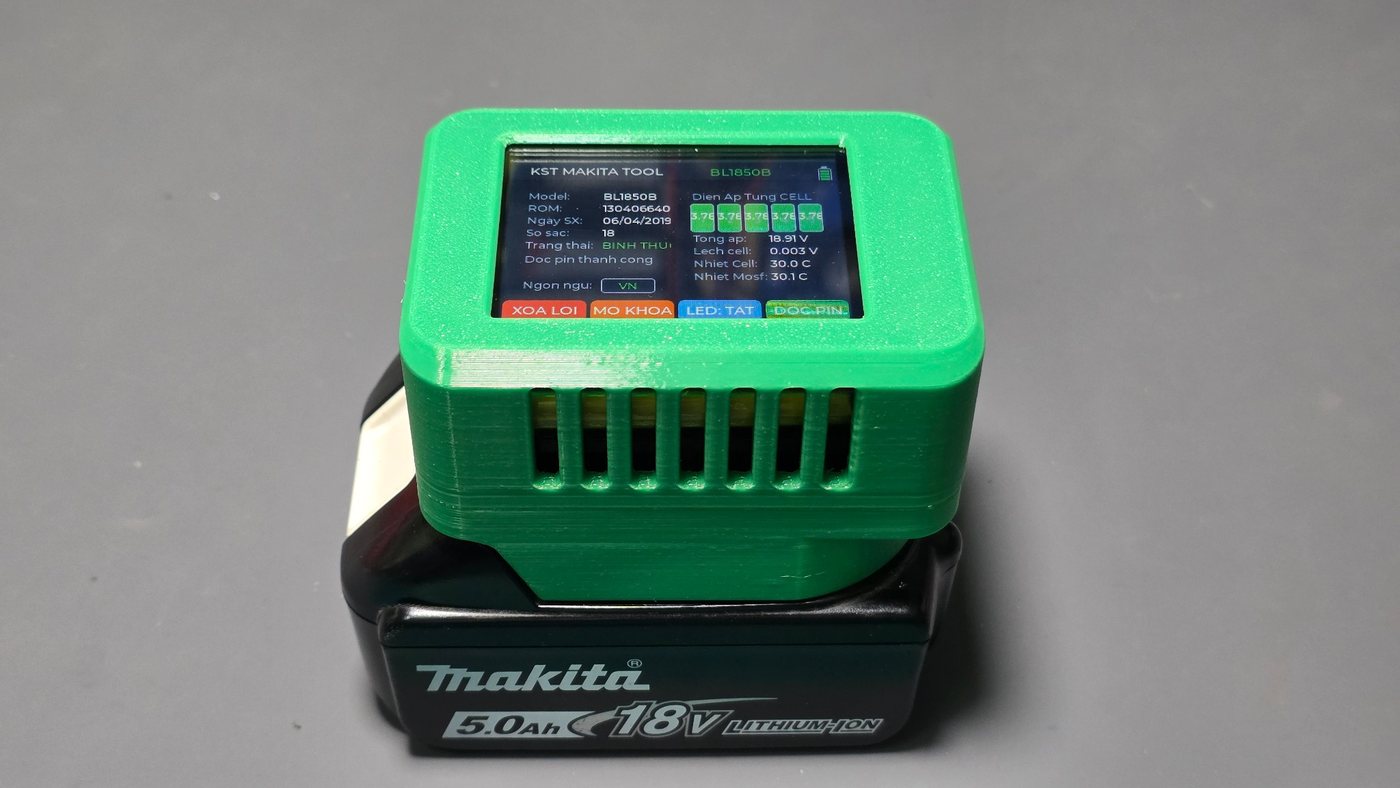
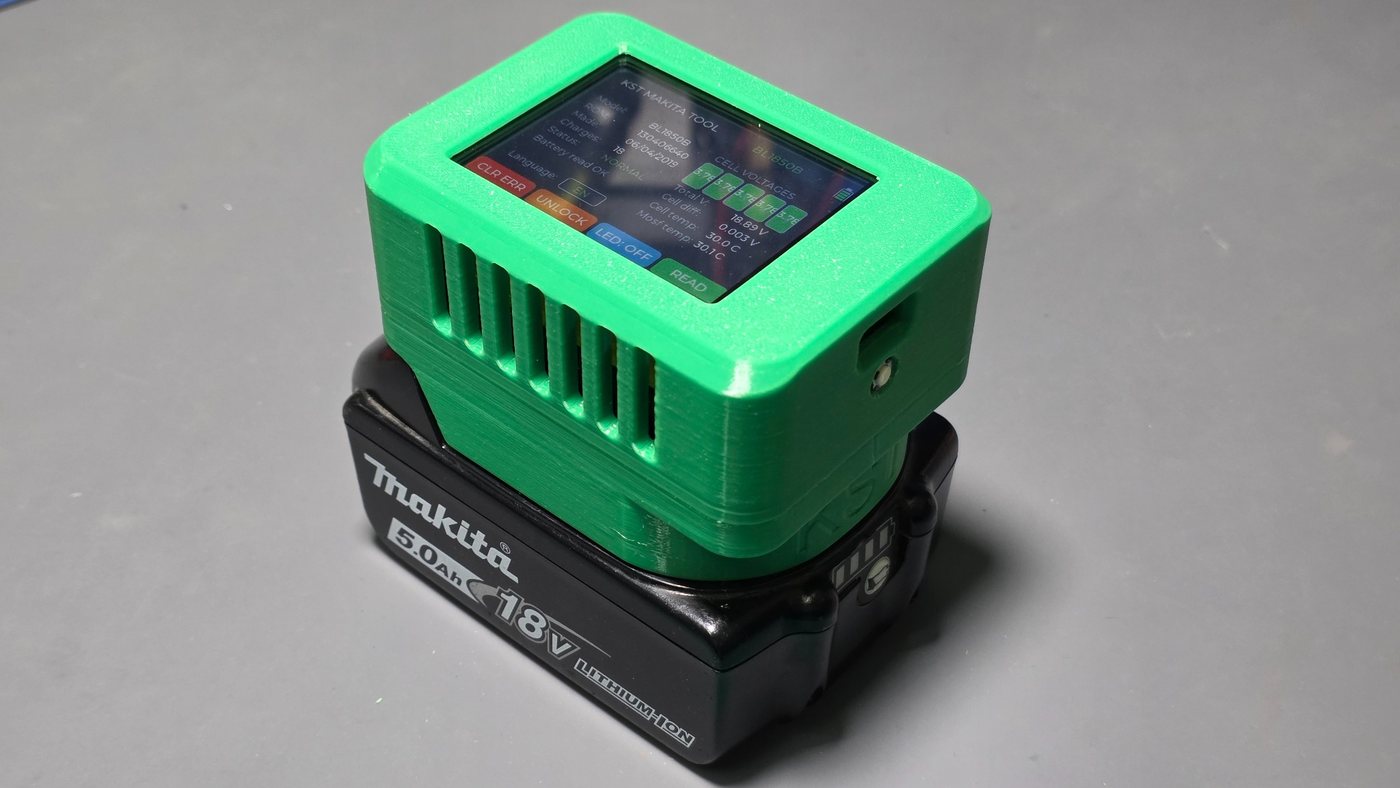
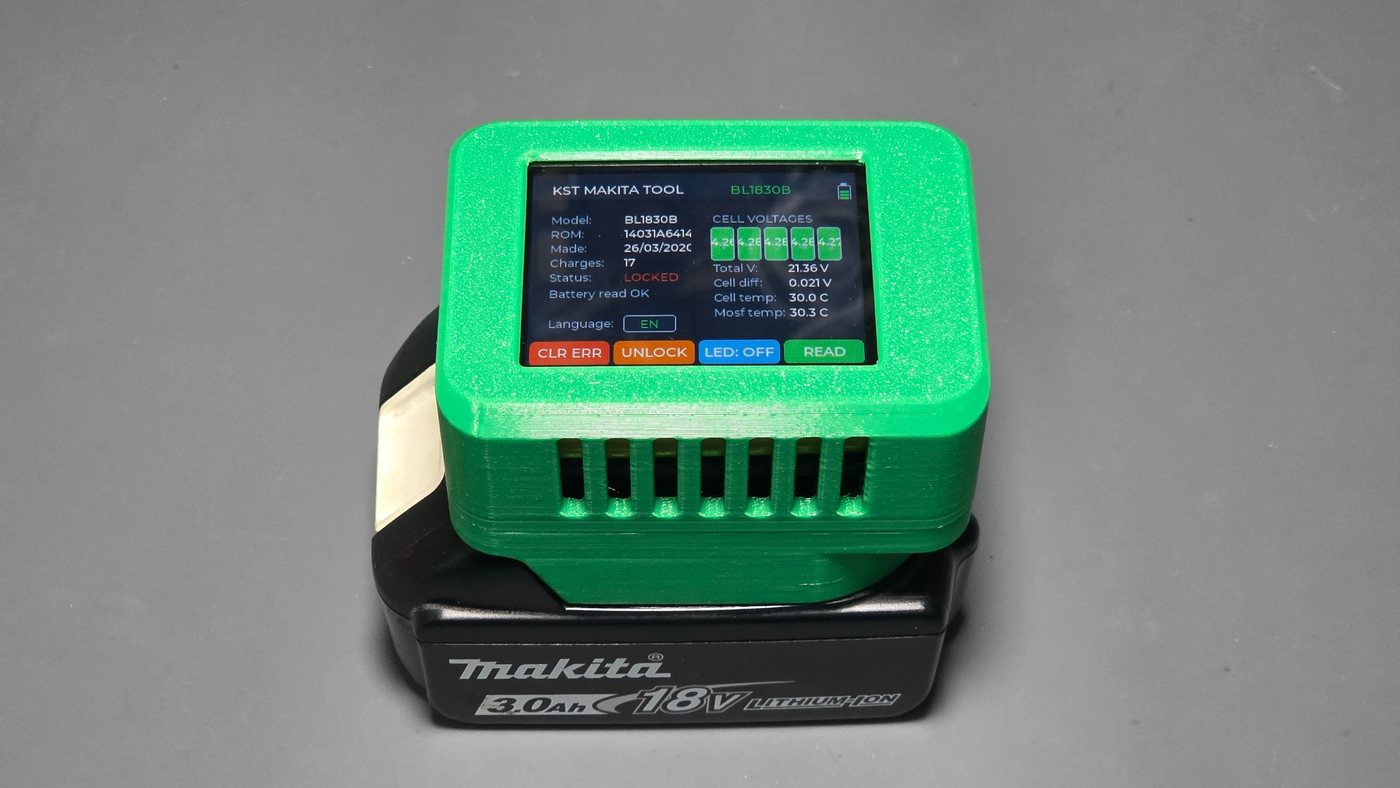
Đọc Model, ROM ID, ngày sản xuất, số lần sạc, điện áp từng cell, nhiệt độ và trạng thái khóa/lỗi.
Reads model, ROM ID, manufacture date, charge cycles, per-cell voltage, temperature, and lock/error state.

KÊNH SÁNG TẠO .COM × Creative Channel
Dành cho đúng board diymore ESP32-S3 ES3C28P / ES3N28P, màn hình cảm ứng 2.8" ILI9341V + FT6336G, 16MB Flash / 8MB PSRAM.
For the correct diymore ESP32-S3 ES3C28P / ES3N28P board with 2.8" ILI9341V + FT6336G capacitive touch, 16MB Flash / 8MB PSRAM.
Firmware đã gộp sẵn, nạp tại offset 0x0. Không rút cáp trong lúc nạp. Merged firmware, flash at offset 0x0. Do not unplug while flashing.
🎁 Firmware hoàn toàn miễn phí dành cho anh em Fans Kênh Sáng Tạo. 🎁 Firmware is completely free for Creative Channel fans.
🌐 Ghi công mã nguồn mở: KST Makita Tool được phát triển dựa một phần trên mã nguồn/nghiên cứu từ dự án Open Battery Information của Martin Jansson. Phần mã nguồn gốc được sử dụng theo MIT License và giữ nguyên thông báo bản quyền của tác giả. Xem dự án gốc trên GitHub. 🌐 Open-source credit: KST Makita Tool is developed in part from code/research from Open Battery Information by Martin Jansson. Upstream portions are used under the MIT License with the original copyright notice preserved. View the original project on GitHub.
Đọc Model, ROM ID, ngày sản xuất, số lần sạc, điện áp từng cell, nhiệt độ và trạng thái khóa/lỗi.
Reads model, ROM ID, manufacture date, charge cycles, per-cell voltage, temperature, and lock/error state.
Thao tác trực tiếp trên màn hình cảm ứng hoặc qua trang điều khiển Wi-Fi.
Operate directly from the touchscreen or from the Wi-Fi control page.
Bật/tắt LED tích hợp trên pack pin Makita hỗ trợ.
Toggle the built-in LED on supported Makita battery packs.
KST-MAKITA-TOOL
Mật khẩu:Password: makita1234
192.168.4.1
Tiếng Việt / English trên cả màn cảm ứng và trang web điều khiển.
Vietnamese / English on both the touchscreen and Wi-Fi web interface.
Giữ BOOT 2 giây để ngủ sâu; bấm BOOT lần nữa để đánh thức.
Hold BOOT for 2 seconds to enter deep sleep; press BOOT again to wake.
Các linh kiện chính dùng để làm KST Makita Tool. Bấm Mua ngay để xem sản phẩm.Main parts used to build the KST Makita Tool. Click Buy now to view each product.
diymore ESP32-S3 ES3C28P / ES3N28P
ILI9341V 2.8" 240×320 · FT6336G cảm ứng điện dung / capacitive touch · 16MB Flash · 8MB PSRAM
Mua tại đây: Buy here: Mua ngayBuy now
Dây/đầu kết nối dùng lấy DATA và ENABLE từ cổng vàng của pack Makita.Connector cable used to access DATA and ENABLE from the Makita pack's yellow connector.
Mua tại đây: Buy here: Mua ngayBuy now
Đế gài pin Makita LXT 14.4V/18V dùng để lắp bộ tool thành một khối gọn gàng.Makita LXT 14.4V/18V battery base for mounting the tool as a compact standalone unit.
Mua tại đây: Buy here: Mua ngayBuy now
1 điện trở 4.7kΩ kéo đường DATA lên 3.3V.One 4.7kΩ resistor used to pull the DATA line up to 3.3V.
Mua tại đây: Buy here: Mua ngayBuy now
Vỏ/box in 3D dành riêng cho KST Makita Tool.Custom 3D-printed enclosure for the KST Makita Tool.
File in 3D: 3D print file: Tải miễn phí trên MakerWorldFree download on MakerWorld
BL1815 / BL1820B / BL1830B / BL1850B hoặc pack tương thích để kiểm tra.or a compatible pack for testing.
Pin JST-PH 2 chân giúp board chạy độc lập. Board có sẵn mạch sạc TP4054.2-pin JST-PH battery for standalone operation. The board has a built-in TP4054 charger.
Mua tại đây: Buy here: Mua ngayBuy now
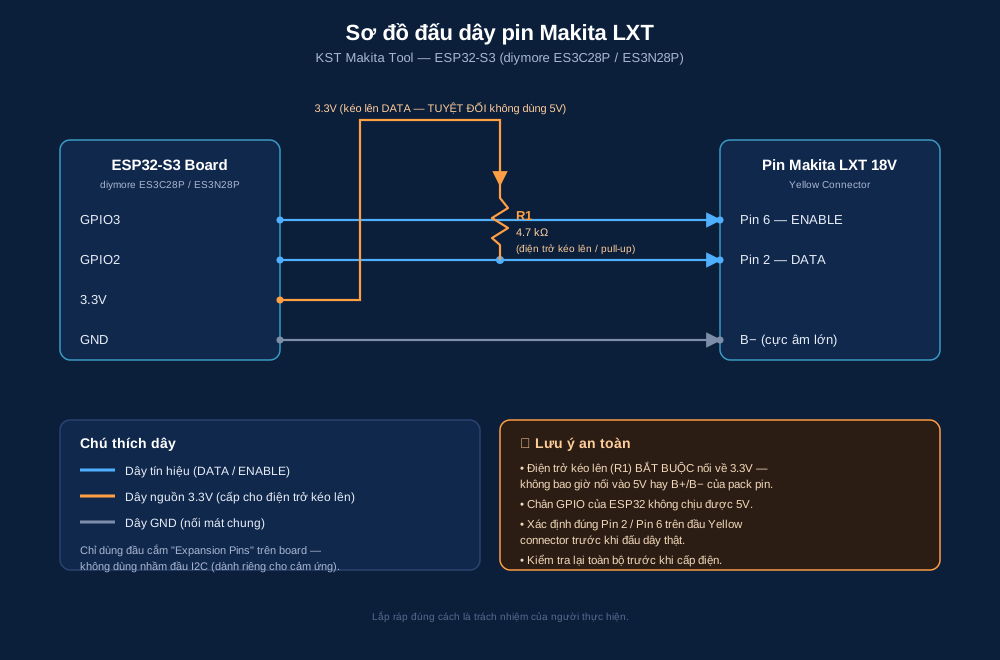
Expansion Pins: DATA → GPIO2, ENABLE → GPIO3, B- → GND. Điện trở 4.7kΩ kéo DATA lên 3.3V. Không dùng nhầm đầu I2C.
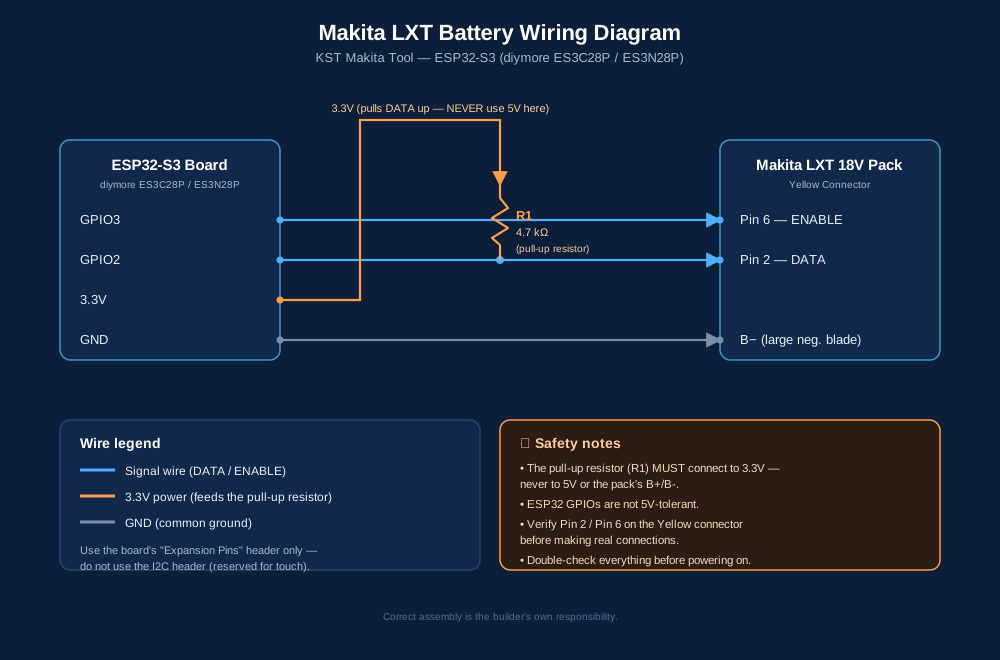
Expansion Pins: DATA → GPIO2, ENABLE → GPIO3, B- → GND. Pull DATA up to 3.3V through 4.7kΩ. Do not use the I2C header.
Xem video đầy đủ cách lắp ráp, đấu nối, sử dụng KST Makita Tool và xử lý pin Makita báo lỗi.
▶ Xem video hướng dẫn tiếng ViệtWatch the complete build, wiring and usage tutorial for the KST Makita Tool and Makita battery error handling.
▶ Watch the English tutorialKST Makita Tool được phát triển dựa một phần trên mã nguồn và nghiên cứu từ dự án mã nguồn mở Open Battery Information của Martin Jansson.
Dự án gốc: https://github.com/mnh-jansson/open-battery-information
Dự án gốc được phát hành theo MIT License. Các phần mã nguồn có nguồn gốc từ Open Battery Information tiếp tục tuân theo các điều khoản của MIT License và giữ nguyên thông báo bản quyền của tác giả gốc.
KST Makita Tool là bản tùy biến/phát triển độc lập của Kênh Sáng Tạo .COM / Creative Channel. Việc ghi công này không có nghĩa Martin Jansson hoặc Open Battery Information bảo trợ hay chịu trách nhiệm cho bản KST.
KST Makita Tool is developed in part from code and research from the open-source Open Battery Information project by Martin Jansson.
Original project: https://github.com/mnh-jansson/open-battery-information
The upstream project is released under the MIT License. Portions originating from Open Battery Information remain subject to the MIT terms and retain the original copyright notice.
KST Makita Tool is an independent customization/development by Kênh Sáng Tạo .COM / Creative Channel. This attribution does not imply endorsement or responsibility by Martin Jansson or Open Battery Information.
Copyright (c) 2024 Martin Jansson

Permission is hereby granted, free of charge, to any person obtaining a copy
of this software and associated documentation files (the "Software"), to deal
in the Software without restriction, including without limitation the rights
to use, copy, modify, merge, publish, distribute, sublicense, and/or sell
copies of the Software, and to permit persons to whom the Software is
furnished to do so, subject to the following conditions:

The above copyright notice and this permission notice shall be included in all
copies or substantial portions of the Software.

THE SOFTWARE IS PROVIDED "AS IS", WITHOUT WARRANTY OF ANY KIND, EXPRESS OR
IMPLIED, INCLUDING BUT NOT LIMITED TO THE WARRANTIES OF MERCHANTABILITY,
FITNESS FOR A PARTICULAR PURPOSE AND NONINFRINGEMENT. IN NO EVENT SHALL THE
AUTHORS OR COPYRIGHT HOLDERS BE LIABLE FOR ANY CLAIM, DAMAGES OR OTHER
LIABILITY, WHETHER IN AN ACTION OF CONTRACT, TORT OR OTHERWISE, ARISING FROM,
OUT OF OR IN CONNECTION WITH THE SOFTWARE OR THE USE OR OTHER DEALINGS IN THE
SOFTWARE.
Dùng nút Nạp firmware ở đầu trang trên Chrome/Edge máy tính, hoặc tải firmware.bin. File đã gộp và nạp tại 0x0. Video hướng dẫn chi tiết nằm ở mục Video.
Use the Install firmware button in desktop Chrome/Edge, or download firmware.bin. It is a merged image flashed at 0x0. The detailed tutorial is available in the Video section.
Dùng đầu Expansion Pins: DATA → GPIO2, ENABLE → GPIO3, B- → GND. Điện trở 4.7kΩ kéo DATA lên 3.3V.
Use the Expansion Pins header: DATA → GPIO2, ENABLE → GPIO3, B- → GND. Pull DATA up to 3.3V with 4.7kΩ.
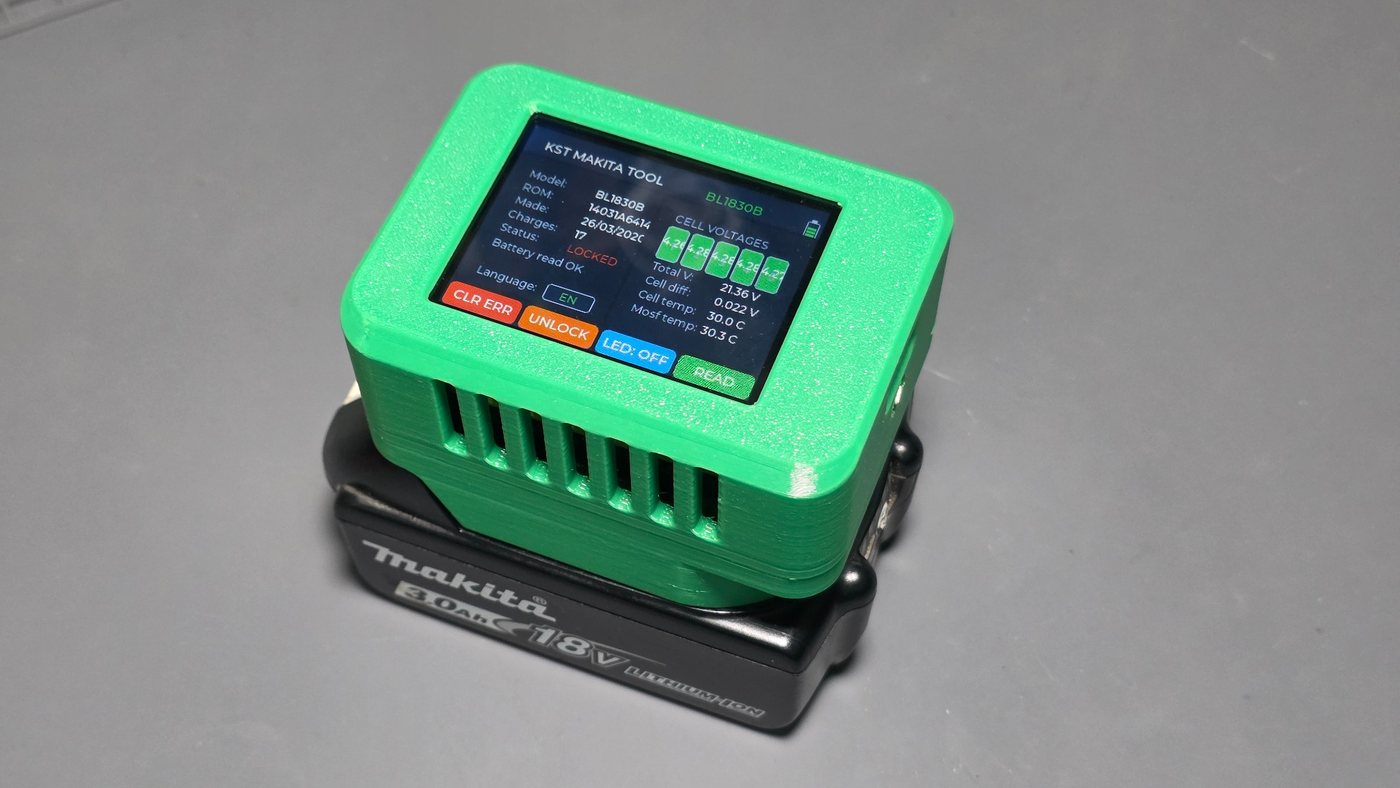
Các nút chính: XÓA LỖI, MỞ KHÓA, LED, ĐỌC PIN. Có nút đổi VN/EN.
Main buttons: CLEAR ERROR, UNLOCK, LED, READ. VI/EN language toggle is available.
Kết nối KST-MAKITA-TOOL, mật khẩu makita1234, sau đó mở 192.168.4.1.
Connect to KST-MAKITA-TOOL, password makita1234, then open 192.168.4.1.
Giữ nút BOOT khoảng 2 giây để tắt màn hình/Wi-Fi và tiết kiệm pin. Bấm BOOT lần nữa để khởi động.
Hold BOOT for about 2 seconds to turn off the screen/Wi-Fi and save power. Press BOOT again to restart.
Điện trở kéo lên DATA chỉ được nối 3.3V; tuyệt đối không nối 5V hoặc B+/B-. GPIO ESP32 không chịu được 5V.
The DATA pull-up must connect to 3.3V only; never connect it to 5V or B+/B-. ESP32 GPIOs are not 5V-tolerant.
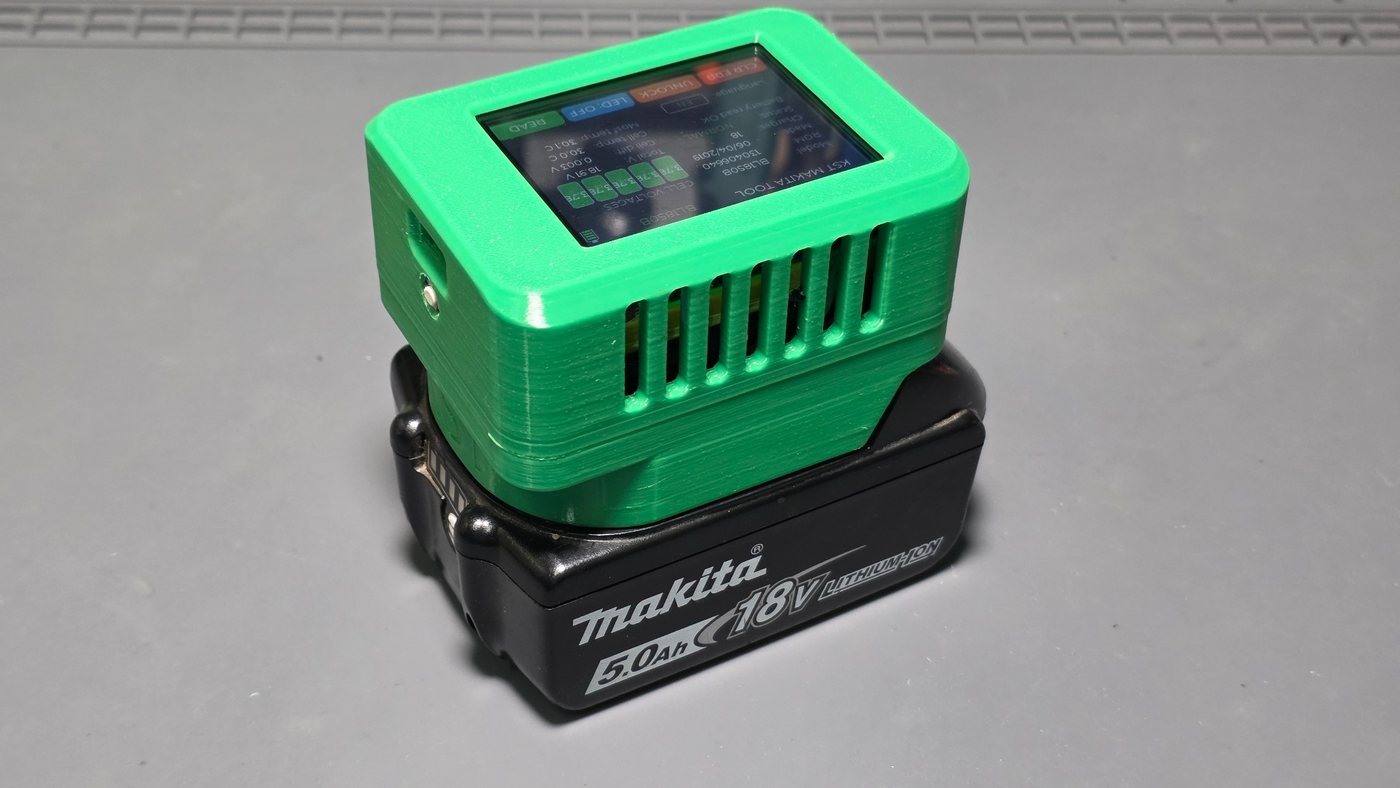
Ảnh thực tế bộ tool sau khi hoàn thiện. Bấm vào ảnh để xem kích thước lớn. Real photos of the finished tool. Click any photo to view it full size.